When I saw the bud in my moonflower plant, I was curious to learn about the moonflower bud stages. It goes through five stages within 3 to 4 months, and each stage marks a significant transformation in the bud’s appearance and development.
Today, I will share everything you need to know about the stages in detail and also care tips on each stage, and more.
What are the Moonflower Bud Stages?
The moonflower bud stages encompass a captivating journey of growth and transformation that this remarkable plant undergoes before unfurling its splendid blossoms.
Moonflowers (Ipomoea alba) are known for their stunning, large white flowers that bloom at night. Also, they emit a sweet fragrance that captures the essence of the evening.
Let’s check out the complexity of these bud stages. Thus, we explore the fascinating progression from the initial formation of buds to the eventual full bloom.
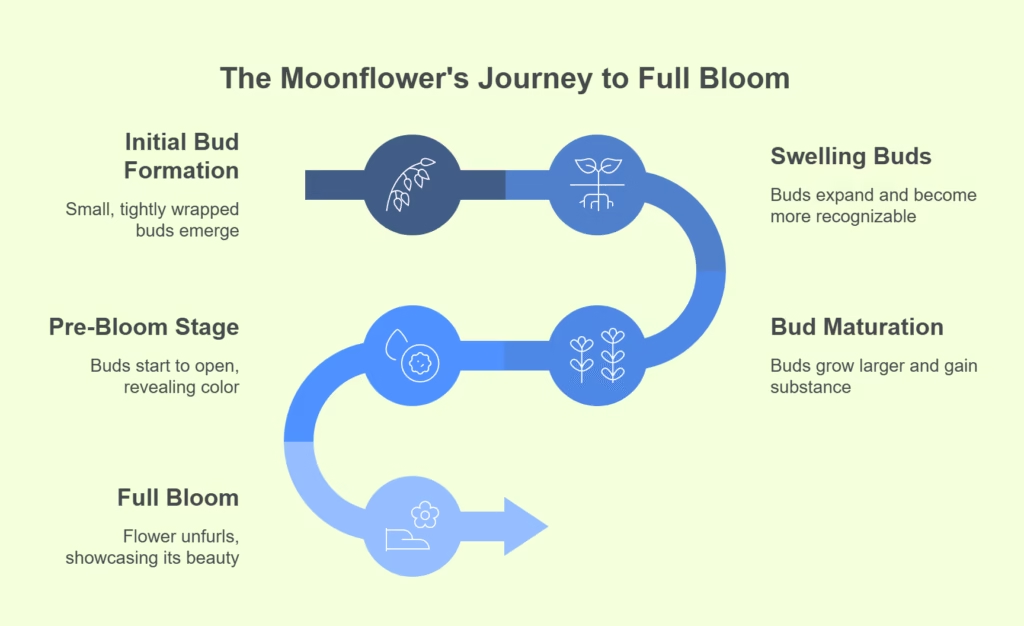
Stage 1: Initial Bud Formation
The journey begins with the emergence of small, tightly wrapped buds at the tips of the moonflower vine’s growing branches. These nascent buds are the promise of what’s to come, harboring the potential for the exquisite beauty that will soon grace the night.
At this stage, they might seem inconspicuous, often nestled among the lush green foliage of the plant.
Stage 2: Swelling Buds
As the moon flower buds progress, they hop on a phase of rapid expansion. The once diminutive buds begin to swell, gradually assuming a more recognizable shape that hints at the marvel that awaits.
This stage marks a remarkable transformation, as the buds increase in size and bulk, seemingly filled with the anticipation of their imminent revelation.
Stage 3: Bud Maturation
With time, the moonflower buds continue their journey toward maturity. During this stage, the buds grow larger still, gaining substance and presence. They may begin to exhibit complex patterns and contours that give a glimpse into the forthcoming splendor of the fully formed flower.
The buds might display a delicate translucence, hinting at the luminosity that will radiate once they open.
Stage 4: Pre-Bloom Stage
A pivotal moment arrives as the moon flower buds enter the pre-bloom stage. Here, the tightly wrapped confines of the buds start to give way, making way for the gradual emergence of the flower within.
Subtle shifts occur, with the outer casing of the bud exhibiting fine cracks, as the pressure from the burgeoning flower within becomes increasingly apparent. At this juncture, observers might discern a faint color change, offering a glimpse of the forthcoming white blossom.
Stage 5: Full Bloom
The culmination of the moonflower bud stages is the awe-inspiring full bloom. As the bud unfurls completely, it reveals the flower’s full glory. Delicate white petals expand outward, forming an exquisite composition that stands as a testament to nature’s artistry.
Moonflowers are renowned for their nocturnal allure, as they open their blossoms during the night, exuding a captivating fragrance that beckons pollinators and admirers alike.
These moonflower bud stages encapsulate a journey of growth and transformation that mirrors the allure of the night itself. From the beginnings of wrapped buds to the grandeur of the fully opened flower, each stage showcases the plant’s vitality and the complex beauty that is inherent in the natural world.
How to Tell If a Moonflower Bud Is About to Open
Curious about how to tell if a moonflower bud is about to open? Spotting the signs early helps you enjoy the brief, magical moment when it blooms at night.
Visual Signs of Imminent Bloom
A moonflower bud that’s ready to open will appear swollen and elongated, with visible ridges forming along the outer casing. You may notice fine lines or cracks at the tip, which signal the bud is under pressure from the expanding petals inside.
As blooming nears, the bud often changes color, typically turning pale green or soft white. Right before opening, some buds lean outward or slightly twist, preparing to unfurl once evening temperatures drop.
Common Mistakes That Delay Blooming
One major mistake is moving or disturbing the plant just before bloom. Sudden changes in location, watering schedule, or light exposure can cause the bud to stall or even drop.
Overfeeding with high-nitrogen fertilizers may also delay flower formation. Make sure your moonflower is getting full sun during the day, minimal root disturbance, and consistent moisture, not soggy soil.
How Long Do Moonflowers Take to Grow?
The growth duration of moonflowers (Ipomoea alba) varies based on factors like temperature, soil quality, and environment. Generally, moonflowers take approximately 3 to 4 months from seed sowing to full bloom.
This timeline comprises several key stages: germination, initial growth, bud development, and eventual blooming. Moon flower plant seeds typically germinate within 7 to 14 days under optimal conditions.
The subsequent growth phases involve the development of leaves, vines, and buds. Swelling of buds and maturation take several weeks, with the pre-bloom stage marked by visible petals and hints of white color.
Full bloom occurs when the flower opens entirely, typically during the night, showcasing its striking appearance and emitting its captivating fragrance. While specific growth times can vary, patience and consistent care are rewarded with the enchanting beauty of moonflowers in their full glory.
Why Your Moonflower Buds Aren’t Blooming
If you’re wondering why your moonflower buds aren’t blooming, you’re not alone. While moonflowers (Ipomoea alba) are famous for their stunning night blooms, they can sometimes hold back. Let’s explore the most common reasons.
Environmental Stress Factors
Moonflower buds may stay closed due to stress from their growing environment. Cool temperatures, lack of sunlight, or sudden weather shifts can all impact blooming.
These night bloomers need full sun during the day and warm conditions to open properly at night. Also, poor soil drainage or compacted roots in containers may limit moonflower bud stages development. Too much nitrogen in the soil can lead to lush leaves but no flowers.
Care Mistakes to Avoid
Overwatering is one of the most common issues. Moonflowers prefer moist but not soggy soil. Also, skipping regular fertilization or using the wrong type of fertilizer can slow the blooming process.
Make sure to provide a trellis or support, as restricted vines may delay flowering. Lastly, avoid planting them too early in spring; moonflowers need steady warmth to thrive.

How to Grow Moonflowers in a Container?
Growing moonflowers (Ipomoea alba) in containers can be a rewarding endeavor. Thus it let’s you enjoy their stunning white blooms even in limited spaces. Here’s a step-by-step guide on how to successfully cultivate moonflowers in a container:
Step 1: Container Selection
Choose a large container with a capacity of at least 5 gallons to provide ample space for the moonflower’s root system. Ensure the container has proper drainage holes to prevent waterlogging.
Step 2: Soil Preparation
Use a well-draining potting mix enriched with compost or organic matter. This promotes healthy root growth and adequate drainage.
Step 3: Sowing Seeds
Sow moon flower plant seeds directly into the container after the last frost date in your area. Plant them about 1 inch deep into the soil, following the recommended spacing on the seed packet.
Step 4: Sunlight
Place the container in a location that receives full sunlight. Moonflowers thrive in sunlight and need at least 6 hours of direct sunlight each day.
Step 5: Watering
Keep the soil consistently moist, but not waterlogged. Water the container thoroughly whenever the top inch of the soil feels dry. Avoid overwatering, as this can lead to root rot.
Step 6: Support
Since moonflowers are climbing vines, provide a trellis, stake, or other support structure in the container. This let’s the vines climb and prevents them from sprawling on the ground.
Step 7: Fertilization
Feed the moonflowers with a balanced liquid fertilizer every 2-3 weeks during the growing season. Follow the manufacturer’s instructions for proper dilution and application.
Step 8: Pruning
Regularly trim away dead or damaged growth to encourage healthy development and maintain the desired shape. This also helps prevent overcrowding and enhances air circulation.
Step 9: Mulching
Apply a layer of organic mulch around the base of the moon flower plants to help retain soil moisture, suppress weeds, and regulate soil temperature.
Step 10: Nighttime Blooming
Keep in mind that moonflowers are night-blooming plants. Their flowers are usually open in the evening and close during the day. Plan their placement in a way that let’s you enjoy their beauty during the nighttime.
Step 11: Winter Care
In colder climates, moonflowers are often grown as annuals. If you want to overwinter them, bring the container indoors before the first frost and place it in a bright, cool location. Trim back the vines and reduce watering. Then let the moon flower plant seeds go dormant.
By following these steps and providing proper care, you can cultivate beautiful moonflowers in containers, adding a touch of elegance and fragrance to your outdoor space.
Are you thinking of growing cosmos in a shaded area? Then you will need to know the challenges and how to overcome them.

Tips to Grow Moonflowers
Here are some short tips to help you successfully get a growing moon flowers in containers:
- Choose the Right Location: Plant in a spot that receives full sunlight for at least 6 hours a day.
- Well-Draining Soil: Use a well-draining potting mix or amend garden soil with compost to improve drainage.
- Proper Watering: Keep the soil consistently moist, but not waterlogged, especially during the growing season.
- Support Structures: Provide trellises, stakes, or fences for the vines to climb and grow vertically.
- Nighttime Beauty: Place them strategically so you can enjoy their night-blooming flowers in the evening.
- Fertilize Regularly: Feed with a balanced liquid fertilizer every 2-3 weeks during the growing season.
- Mulching: Apply organic mulch to retain moisture, regulate soil temperature, and suppress weeds.
- Pruning: Trim away dead or damaged growth to encourage healthy development and maintain shape.
- Monitor Pests: Watch for pests like aphids and caterpillars; use appropriate treatments if needed.
- Collect Seeds: Harvest seeds from mature pods for future moonflower planting.
- Overwintering: In colder climates, bring containers indoors before frost or replant seeds in spring.
Following these tips will enhance your chances of growing healthy moon flowers. If you have any moon flower problems to know about, you can comment below so that we can cover that in the future to help you solve the problem.
FAQs
Can you speed up the moonflower’s bud stages?
While you can’t drastically accelerate the natural growth process, providing optimal conditions like adequate sunlight, proper watering, and nutrient-rich soil can help promote healthy growth and potentially slightly expedite the bud stages.
What happens if a moonflower bud doesn’t open?
If a moonflower bud fails to open, it could be due to issues like insufficient light, extreme temperatures, inadequate pollination, or pest damage. Ensuring proper care and addressing these factors can increase the likelihood of successful blooming.
Can you harvest moonflower seeds from buds?
It’s best to wait until moon flowers have completed their blooming cycle and the flowers have withered before attempting to harvest seeds. You should let the flowers mature and dry on the vine, then collect the seeds from the dried pods.
Make sure you don’t miss our latest article on issues of bad smell in orchid and solutions.